The JMBA Hub, developed by JMBA Soluções, connects your GLPI to your phone so you can follow tickets and receive notifications. In this guide you will find the links to join the Android tests and the step by step to prepare GLPI with the plugin and the API.
The screens in this tutorial were captured on a real GLPI 11.0.8 install, with the JMBA Hub 1.4.0 plugin. The app is in testing: use the same Google account in the tester group, when joining the test and on the Play Store.
1. Join the tester group
The first step is to open the Testadores JMBA Hub group on Google Groups. Sign in with the Google account you use on your Android phone and request or confirm your participation, according to the options shown.
If a restricted-access message appears, check that you are signed in to the correct account. If entry requires approval, wait for it to be granted or contact the group administrators before trying to install the app.
2. Join the test and download the app
With your account authorized in the group, open the JMBA Hub test participation page.
Agree to join the testing program.
Use the link shown by Google to install the app, or open the JMBA Hub page on Google Play.
Access to the download depends on your account being cleared for the test. If the Play Store says the app was not found or is not available, check the selected account, the group membership and the test enrollment. The link may not work for visitors who are not signed in or who do not have access to the program.
To use the app you also need your organization's GLPI address and a valid user on that install. Joining the group does not create a GLPI account.
3. Download and install the JMBA Hub plugin
The plugin integrates GLPI with the app and brings together the access-control and notification settings. The code is public and lives in the JMBA-Solucoes/jmbahub repository.
Download the package from release 1.4.0: ZIP download or TAR.GZ download.
Back up before changing a live install.
Extract the package into GLPI's
pluginsdirectory.Check that the files landed in
plugins/jmbahub. The folder must be named jmbahub, without a hyphen.Sign in to GLPI with a profile that can administer plugins.
Open Setup → Plugins, find JMBA Hub and run the install and enable actions.
Prefer the ZIP or TAR.GZ packages attached to the release: they already include the folder with the correct name. See the plugin README for console installation and compatibility details.

JMBA Hub 1.4.0 in GLPI's plugin list, authored by JMBA Soluções.
4. Enable the GLPI API
The app uses the API to authenticate the user and query data according to GLPI permissions. In GLPI 11, the screen separates the new API from the legacy REST API. JMBA Hub's current login flow uses the legacy API with username and password; enabling only the new API does not cover this flow.
Go to Setup → General → API.
In the Legacy API section, turn on Enable Legacy REST API. If GLPI asks for confirmation, confirm to use this integration.
Turn on Enable login with credentials.
Click Save.
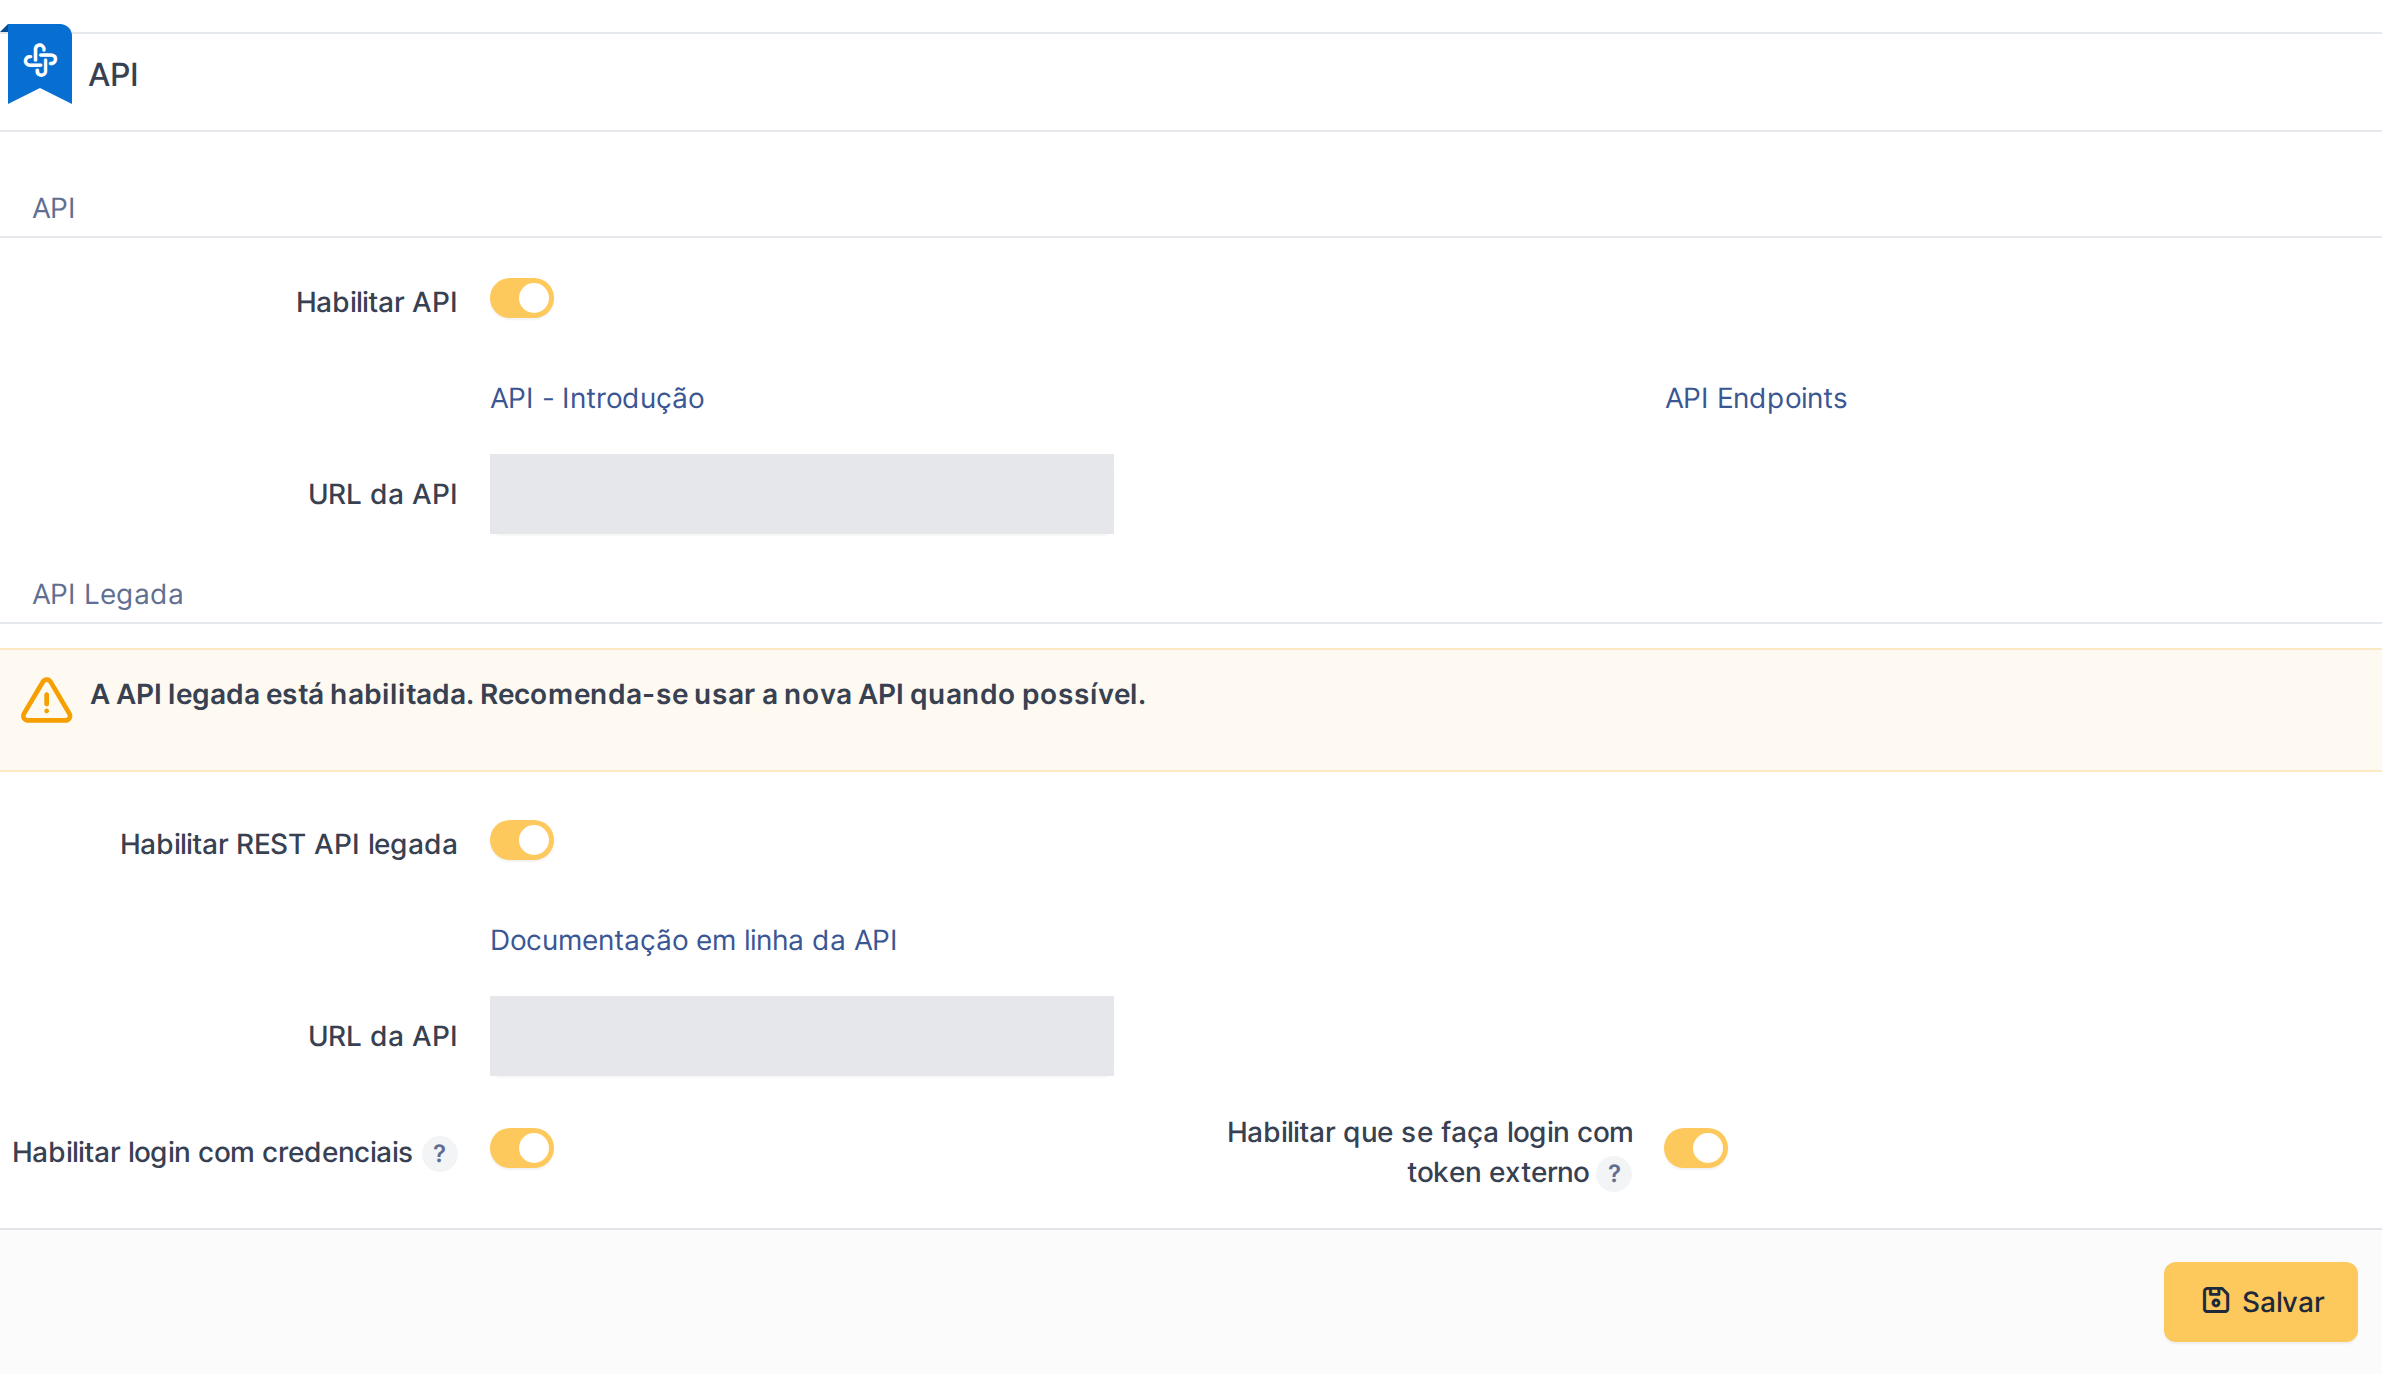
GLPI 11.0.8 API screen. The server address fields were hidden in the screenshot.
The Enable login with external token option is different from login with username and password. It shows as on in the screenshot's environment, but it does not need to be enabled just for this app login flow.
Check the API client and the App-Token
On the same tab, review API clients (Legacy API). If your GLPI configuration requires an App-Token, the administrator must create or configure a client and make that token available in the matching setting of the JMBA Hub integration.
If there is an IP restriction, authorize the outbound address of the backend that reaches GLPI. A client restricted to localhost does not automatically allow a remote backend. Do not confuse the App-Token with the user's personal token, and do not share tokens in comments or screenshots.
5. Configure the plugin and user access
Open the JMBA Hub settings in the plugin list. The panel lets you adjust access control to the app and the notification rules.
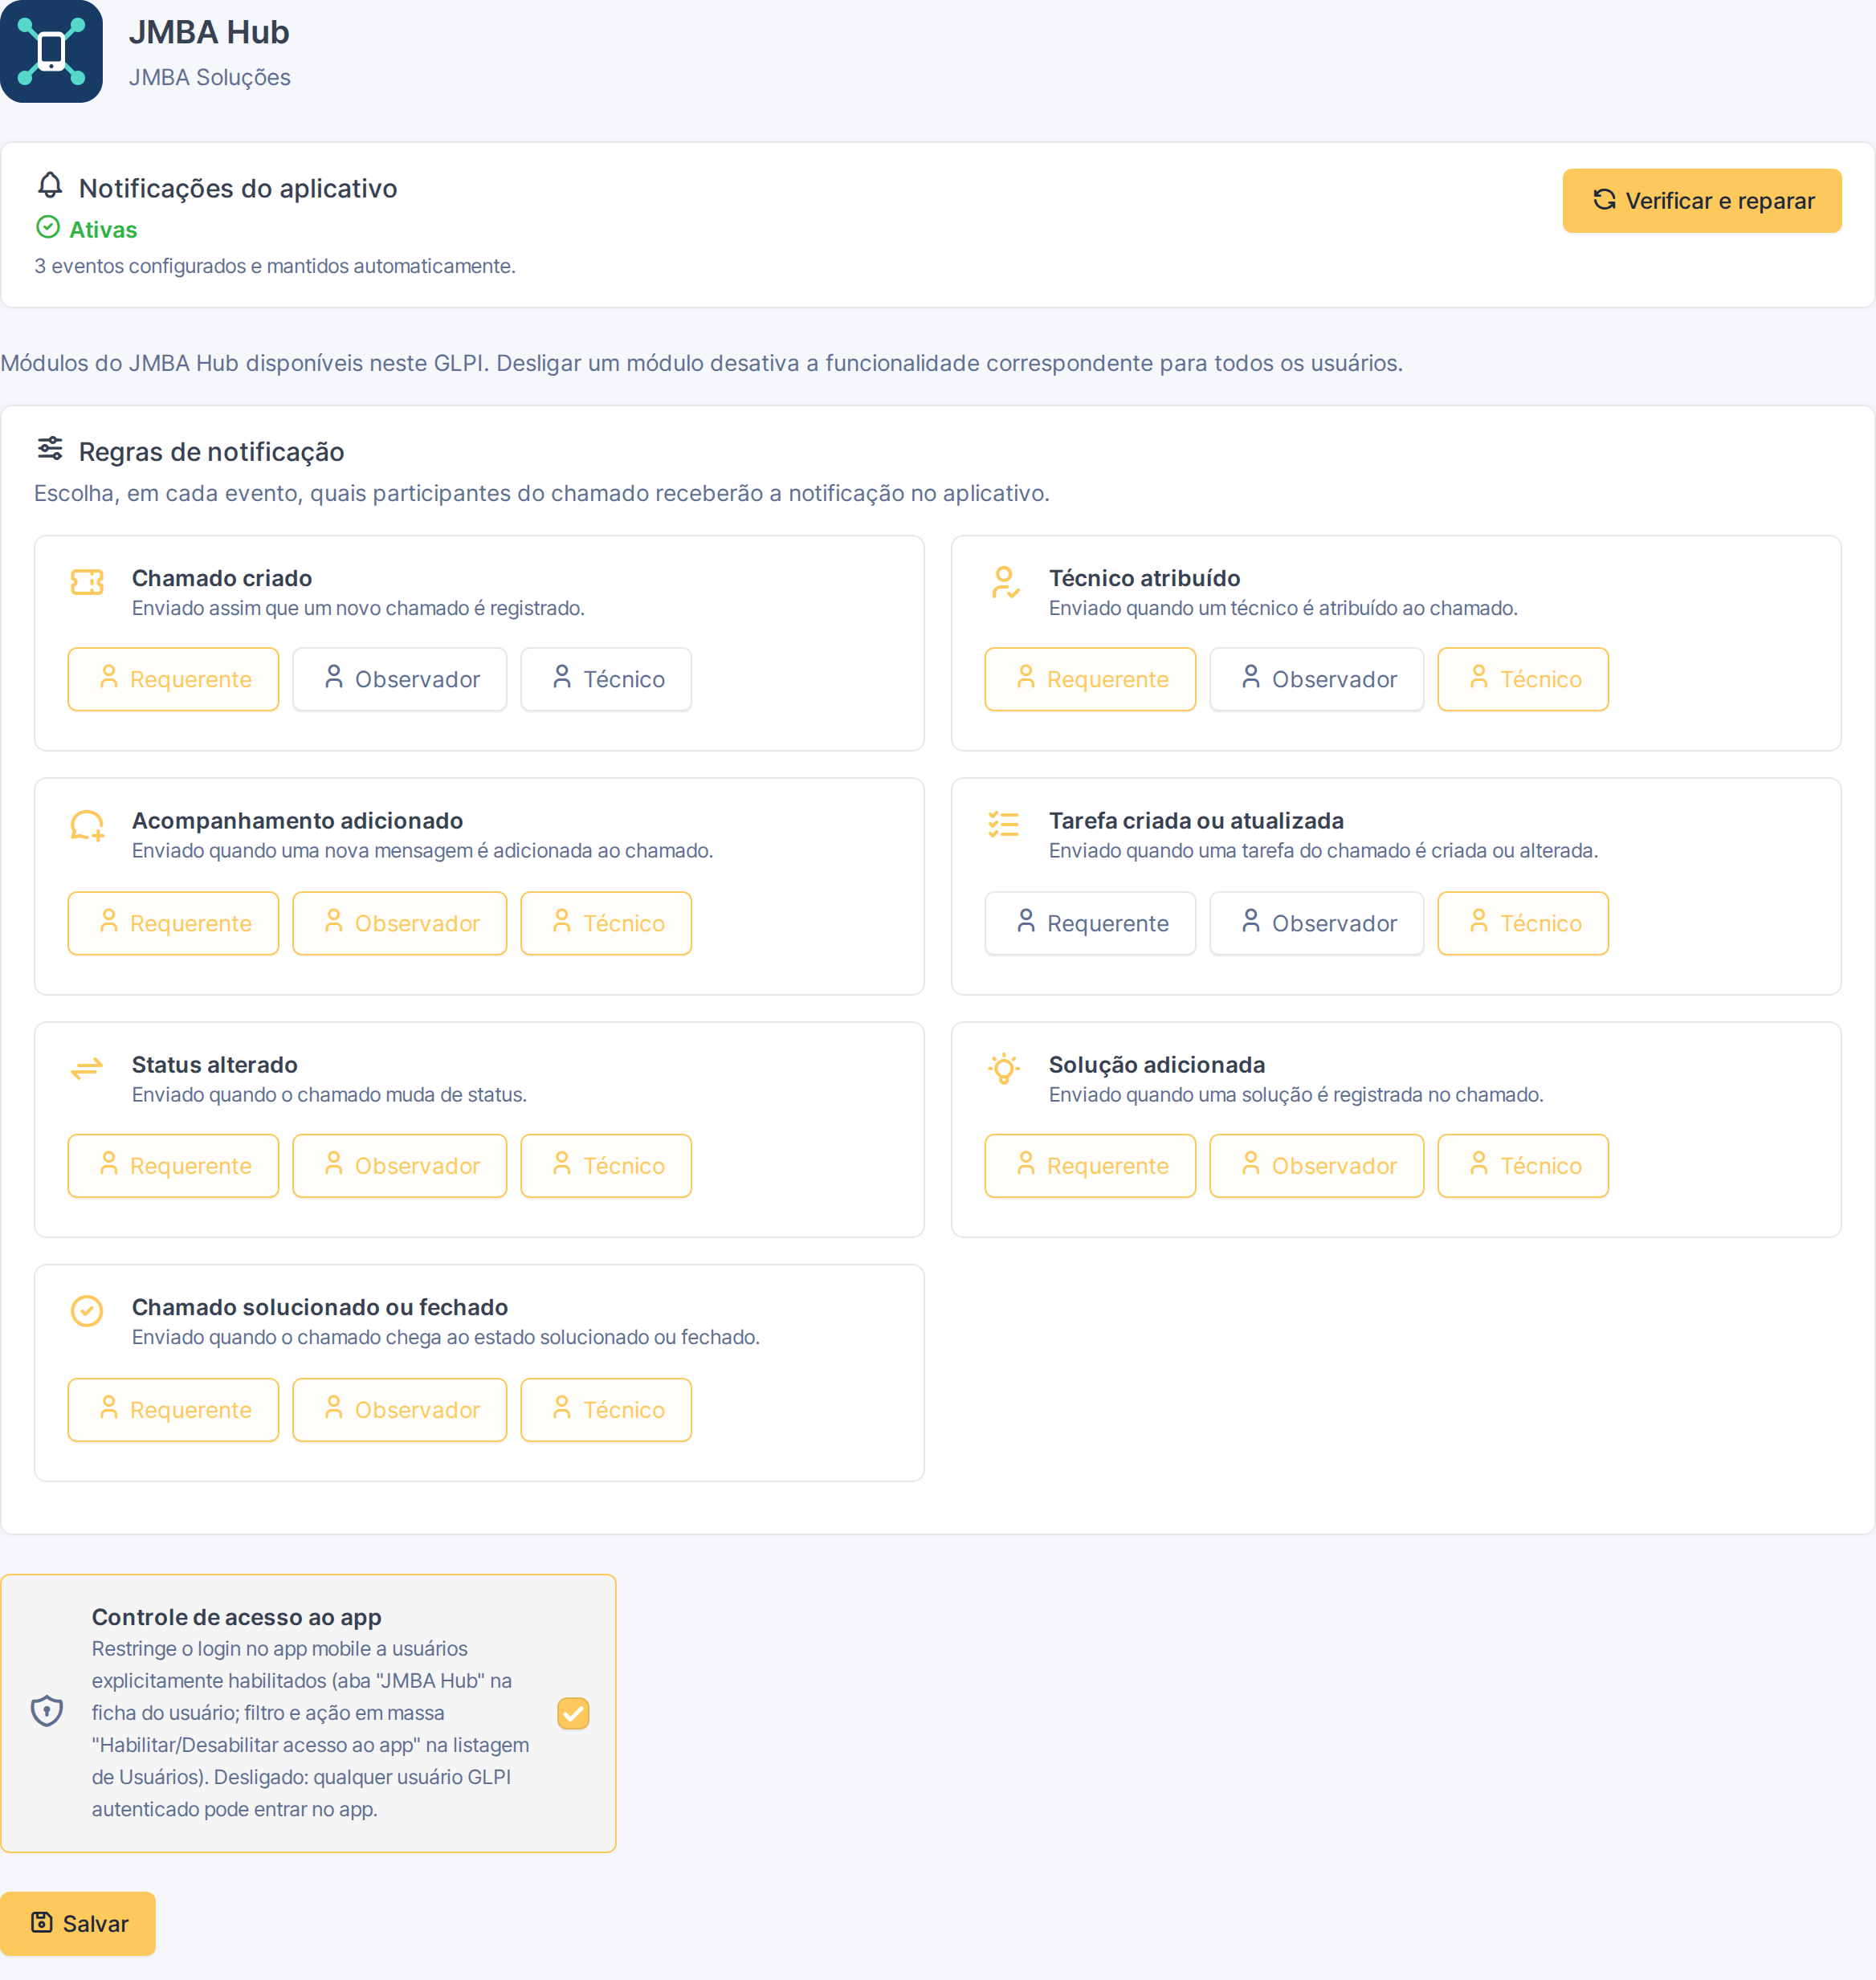
JMBA Hub panel: notifications and recipient selection per event.
Access control to the app: when enabled, only allowed users can sign in through the app. Manage access in the JMBA Hub tab of the user record or via mass actions in Administration → Users.
Notifications: use Enable notifications or Check and repair, depending on the state shown. Check GLPI's base URL and the connection with the JMBA Hub service.
Recipients: choose which events are sent to requesters, watchers and technicians.
The plugin relies on the JMBA Hub backend for the mobile flows and notification delivery. Installing it does not replace configuring that integration or the profile permissions in GLPI.
6. Do the first login and validate
Open JMBA Hub on Android, enter your organization's GLPI address and sign in with your username and password. Use the system's base address, for example https://glpi.yourcompany.com, respecting any install subdirectory as well.
Confirm that you can sign in, see the tickets allowed for your profile and open a ticket's details. If notifications are configured, allow notifications on Android and validate an event with the support team.
Common problems
App unavailable on the Play Store: check the Google account, the group link and the test enrollment.
Login refused: validate the credentials, the legacy REST API, login with credentials and the user's clearance in the plugin.
Connection failure: check the GLPI URL, server availability and the API client rules.
Logo or plugin changes do not appear: clear the GLPI cache. If PHP uses
opcache.validate_timestamps=0, the administrator must reload PHP-FPM to apply file changes.
Links to get started
During the tests, send your feedback through the group. Include the GLPI version, the phone model and the steps to reproduce the problem, without including passwords, tokens or personal data from tickets.